Flux 架构入门教程
2020-06-24
Ann Ann
一、Flux 是什么?
简单说,Flux 是一种架构思想,专门解决软件的结构问题。它跟MVC 架构是同一类东西,但是更加简单和清晰。
Flux存在多种实现(至少15种),本文采用的是Facebook官方实现。
二、安装 Demo
为了便于讲解,我写了一个Demo。
请先安装一下。
$ git clone https://github.com/ruanyf/extremely-simple-flux-demo.git
$ cd extremely-simple-flux-demo && npm install
$ npm start
然后,访问 http://127.0.0.1:8080 。
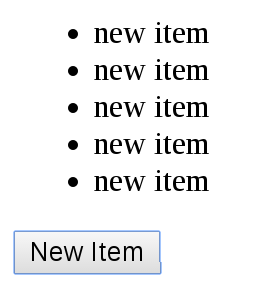
你会看到一个按钮。这就是我们的Demo。
三、基本概念
讲解代码之前,你需要知道一些 Flux 的基本概念。
首先,Flux将一个应用分成四个部分。
- View: 视图层
- Action(动作):视图层发出的消息(比如mouseClick)
- Dispatcher(派发器):用来接收Actions、执行回调函数
- Store(数据层):用来存放应用的状态,一旦发生变动,就提醒Views要更新页面
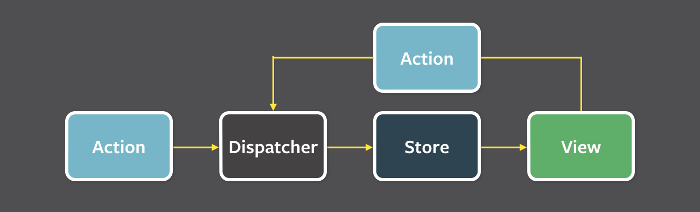
Flux 的最大特点,就是数据的“单向流动”。
- 用户访问 View
- View 发出用户的 Action
- Dispatcher 收到 Action,要求 Store 进行相应的更新
- Store 更新后,发出一个“change”事件
- View 收到“change”事件后,更新页面
上面过程中,数据总是“单向流动”,任何相邻的部分都不会发生数据的“双向流动”。这保证了流程的清晰。
读到这里,你可能感到一头雾水,OK,这是正常的。接下来,我会详细讲解每一步。
四、View(第一部分)
请打开 Demo 的首页index.jsx ,你会看到只加载了一个组件。
// index.jsx
var React = require('react');
var ReactDOM = require('react-dom');
var MyButtonController = require('./components/MyButtonController');

ReactDOM.render(
  <MyButtonController/>,
  document.querySelector('#example')
);
上面代码中,你可能注意到了,组件的名字不是 MyButton,而是 MyButtonController。这是为什么?
这里,我采用的是 React 的 controller view 模式。“controller view”组件只用来保存状态,然后将其转发给子组件。MyButtonController'的源码很简单。
// components/MyButtonController.jsx
var React = require('react');
var ButtonActions = require('../actions/ButtonActions');
var MyButton = require('./MyButton');

var MyButton = React.createClass({
  createNewItem: function (event) {
    ButtonActions.addNewItem('new item');
  },

  render: function() {
    return <MyButton
      onClick={this.createNewItem}
    />;
  }
});

module.exports = MyButton;
上面代码中,MyButtonController将参数传给子组件MyButton。后者的源码甚至更简单。
// components/MyButton.jsx
var React = require('react');

var MyButton = function(props) {
  return <div>
    <button onClick={props.onClick}>New Item</button>
  </div>;
};

module.exports = MyButton;
上面代码中,你可以看到MyButton是一个纯组件(即不含有任何状态),从而方便了测试和复用。这就是“controll view”模式的最大优点。
MyButton只有一个逻辑,就是一旦用户点击,就调用this.createNewItem 方法,向Dispatcher发出一个Action。
// components/MyButtonController.jsx

  // ...
  createNewItem: function (event) {
    ButtonActions.addNewItem('new item');
  }
上面代码中,调用createNewItem方法,会触发名为addNewItem的Action。
五、Action
每个Action都是一个对象,包含一个actionType属性(说明动作的类型)和一些其他属性(用来传递数据)。
在这个Demo里面,ButtonActions 对象用于存放所有的Action。
// actions/ButtonActions.js
var AppDispatcher = require('../dispatcher/AppDispatcher');

var ButtonActions = {
  addNewItem: function (text) {
    AppDispatcher.dispatch({
      actionType: 'ADD_NEW_ITEM',
      text: text
    });
  },
};
上面代码中,ButtonActions.addNewItem方法使用AppDispatcher,把动作 ADD_NEW_ITEM派发到Store。
六、Dispatcher
Dispatcher 的作用是将 Action 派发到 Store、。你可以把它看作一个路由器,负责在 View 和 Store 之间,建立 Action 的正确传递路线。注意,Dispatcher 只能有一个,而且是全局的。
Facebook官方的 Dispatcher 实现输出一个类,你要写一个AppDispatcher.js,生成 Dispatcher 实例。
// dispatcher/AppDispatcher.js
var Dispatcher = require('flux').Dispatcher;
module.exports = new Dispatcher();
AppDispatcher.register()方法用来登记各种Action的回调函数。
// dispatcher/AppDispatcher.js
var ListStore = require('../stores/ListStore');

AppDispatcher.register(function (action) {
  switch(action.actionType) {
    case 'ADD_NEW_ITEM':
      ListStore.addNewItemHandler(action.text);
      ListStore.emitChange();
      break;
    default:
      // no op
  }
})
上面代码中,Dispatcher收到ADD_NEW_ITEM动作,就会执行回调函数,对ListStore进行操作。
记住,Dispatcher 只用来派发 Action,不应该有其他逻辑。
七、Store
Store 保存整个应用的状态。它的角色有点像 MVC 架构之中的Model 。
在我们的 Demo 中,有一个ListStore,所有数据都存放在那里。
// stores/ListStore.js
var ListStore = {
  items: [],

  getAll: function() {
    return this.items;
  },

  addNewItemHandler: function (text) {
    this.items.push(text);
  },

  emitChange: function () {
    this.emit('change');
  }
};

module.exports = ListStore;
上面代码中,ListStore.items用来保存条目,ListStore.getAll()用来读取所有条目,ListStore.emitChange()用来发出一个“change”事件。
由于 Store 需要在变动后向 View 发送“change”事件,因此它必须实现事件接口。
// stores/ListStore.js
var EventEmitter = require('events').EventEmitter;
var assign = require('object-assign');

var ListStore = assign({}, EventEmitter.prototype, {
  items: [],

  getAll: function () {
    return this.items;
  },

  addNewItemHandler: function (text) {
    this.items.push(text);
  },

  emitChange: function () {
    this.emit('change');
  },

  addChangeListener: function(callback) {
    this.on('change', callback);
  },

  removeChangeListener: function(callback) {
    this.removeListener('change', callback);
  }
});
上面代码中,ListStore继承了EventEmitter.prototype,因此就能使用ListStore.on()和ListStore.emit(),来监听和触发事件了。
Store 更新后(this.addNewItemHandler())发出事件(this.emitChange()),表明状态已经改变。 View 监听到这个事件,就可以查询新的状态,更新页面了。
八、View (第二部分)
现在,我们再回过头来修改 View ,让它监听 Store 的 change 事件。
// components/MyButtonController.jsx
var React = require('react');
var ListStore = require('../stores/ListStore');
var ButtonActions = require('../actions/ButtonActions');
var MyButton = require('./MyButton');

var MyButtonController = React.createClass({
  getInitialState: function () {
    return {
      items: ListStore.getAll()
    };
  },

  componentDidMount: function() {
    ListStore.addChangeListener(this._onChange);
  },

  componentWillUnmount: function() {
    ListStore.removeChangeListener(this._onChange);
  },

  _onChange: function () {
    this.setState({
      items: ListStore.getAll()
    });
  },

  createNewItem: function (event) {
    ButtonActions.addNewItem('new item');
  },

  render: function() {
    return <MyButton
      items={this.state.items}
      onClick={this.createNewItem}
    />;
  }
});
上面代码中,你可以看到当MyButtonController 发现 Store 发出 change 事件,就会调用 this._onChange 更新组件状态,从而触发重新渲染。
// components/MyButton.jsx
var React = require('react');

var MyButton = function(props) {
  var items = props.items;
  var itemHtml = items.map(function (listItem, i) {
    return <li key={i}>{listItem}</li>;
  });

  return <div>
    <ul>{itemHtml}</ul>
    <button onClick={props.onClick}>New Item</button>
  </div>;
};

module.exports = MyButton;
Mooc系统项目实战课01期
![]() 2025/07/14 08:25 (Sydney)
2025/07/14 08:25 (Sydney)
AI Agent & MCP 项目实战营
![]() 2025/07/19 09:00 (Sydney)
2025/07/19 09:00 (Sydney)
AI for Data Analyst
![]() 2025/07/19 09:00 (Sydney)
2025/07/19 09:00 (Sydney)
Follow Us
We Accept
地址
Level 10b, 144 Edward Street, Brisbane CBD(Headquarter)Level 2, 171 La Trobe St, Melbourne VIC 3000四川省成都市武侯区桂溪街道天府大道中段500号D5东方希望天祥广场B座45A13号Business Hub, 155 Waymouth St, Adelaide SA 5000Disclaimer
JR Academy acknowledges Traditional Owners of Country throughout Australia and recognises the continuing connection to lands, waters and communities. We pay our respect to Aboriginal and Torres Strait Islander cultures; and to Elders past and present. Aboriginal and Torres Strait Islander peoples should be aware that this website may contain images or names of people who have since passed away.
匠人学院网站上的所有内容,包括课程材料、徽标和匠人学院网站上提供的信息,均受澳大利亚政府知识产权法的保护。严禁未经授权使用、销售、分发、复制或修改。违规行为可能会导致法律诉讼。通过访问我们的网站,您同意尊重我们的知识产权。 JR Academy Pty Ltd 保留所有权利,包括专利、商标和版权。任何侵权行为都将受到法律追究。查看用户协议
© 2017-2025 JR Academy Pty Ltd. All rights reserved.
ABN 26621887572