Koa 框架教程
2020-06-28
Ann Ann
零、准备
首先,检查 Node 版本。
$ node -v
v8.0.0
Koa 必须使用 7.6 以上的版本。如果你的版本低于这个要求,就要先升级 Node。
然后,克隆本文的配套示例库。(如果不方便使用 Git,也可以下载 zip 文件解压。)
$ git clone https://github.com/ruanyf/koa-demos.git
接着,进入示例库,安装依赖。
$ cd koa-demos
$ npm install
所有示例源码,都在 demos 目录下面。
一、基本用法
1.1 架设 HTTP 服务
只要三行代码,就可以用 Koa 架设一个 HTTP 服务。
// demos/01.js
const Koa = require('koa');
const app = new Koa();

app.listen(3000);
运行这个脚本。
$ node demos/01.js
打开浏览器,访问 http://127.0.0.1:3000 。你会看到页面显示“Not Found”,表示没有发现任何内容。这是因为我们并没有告诉 Koa 应该显示什么内容。

1.2 Context 对象
Koa 提供一个 Context 对象,表示一次对话的上下文(包括 HTTP 请求和 HTTP 回复)。通过加工这个对象,就可以控制返回给用户的内容。
Context.response.body属性就是发送给用户的内容。请看下面的例子(完整的代码看这里)。
// demos/02.js
const Koa = require('koa');
const app = new Koa();

const main = ctx => {
  ctx.response.body = 'Hello World';
};

app.use(main);
app.listen(3000);
上面代码中,main函数用来设置ctx.response.body。然后,使用app.use方法加载main函数。
你可能已经猜到了,ctx.response代表 HTTP Response。同样地,ctx.request代表 HTTP Request。
运行这个 demo。
$ node demos/02.js
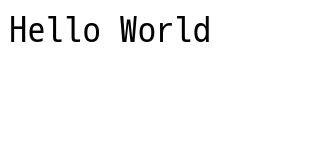
访问 http://127.0.0.1:3000 ,现在就可以看到“Hello World”了。
1.3 HTTP Response 的类型
Koa 默认的返回类型是text/plain,如果想返回其他类型的内容,可以先用ctx.request.accepts判断一下,客户端希望接受什么数据(根据 HTTP Request 的Accept字段),然后使用ctx.response.type指定返回类型。请看下面的例子(完整代码看这里)。
// demos/03.js
const main = ctx => {
  if (ctx.request.accepts('xml')) {
    ctx.response.type = 'xml';
    ctx.response.body = '<data>Hello World</data>';
  } else if (ctx.request.accepts('json')) {
    ctx.response.type = 'json';
    ctx.response.body = { data: 'Hello World' };
  } else if (ctx.request.accepts('html')) {
    ctx.response.type = 'html';
    ctx.response.body = '<p>Hello World</p>';
  } else {
    ctx.response.type = 'text';
    ctx.response.body = 'Hello World';
  }
};
运行这个 demo。
$ node demos/03.js
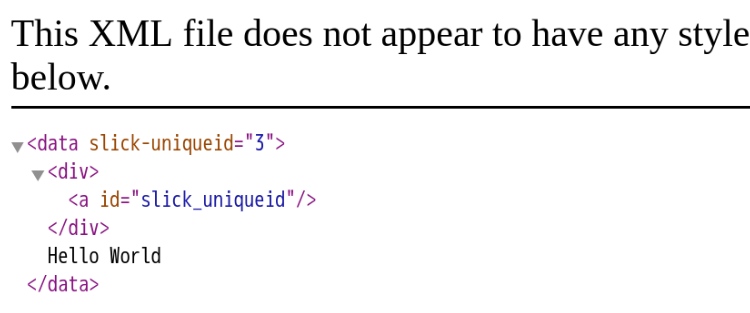
访问 http://127.0.0.1:3000 ,现在看到的就是一个 XML 文档了。
1.4 网页模板
实际开发中,返回给用户的网页往往都写成模板文件。我们可以让 Koa 先读取模板文件,然后将这个模板返回给用户。请看下面的例子(完整代码看这里)。
// demos/04.js
const fs = require('fs');

const main = ctx => {
  ctx.response.type = 'html';
  ctx.response.body = fs.createReadStream('./demos/template.html');
};
运行这个 Demo。
$ node demos/04.js
访问 http://127.0.0.1:3000 ,看到的就是模板文件的内容了。

二、路由
2.1 原生路由
网站一般都有多个页面。通过ctx.request.path可以获取用户请求的路径,由此实现简单的路由。请看下面的例子(完整代码看这里)。
// demos/05.js
const main = ctx => {
  if (ctx.request.path !== '/') {
    ctx.response.type = 'html';
    ctx.response.body = '<a href="/">Index Page</a>';
  } else {
    ctx.response.body = 'Hello World';
  }
};
运行这个 demo。
$ node demos/05.js
访问 http://127.0.0.1:3000/about ,可以看到一个链接,点击后就跳到首页。

2.2 koa-route 模块
原生路由用起来不太方便,我们可以使用封装好的koa-route模块。请看下面的例子(完整代码看这里)。
// demos/06.js
const route = require('koa-route');

const about = ctx => {
  ctx.response.type = 'html';
  ctx.response.body = '<a href="/">Index Page</a>';
};

const main = ctx => {
  ctx.response.body = 'Hello World';
};

app.use(route.get('/', main));
app.use(route.get('/about', about));
上面代码中,根路径/的处理函数是main,/about路径的处理函数是about。
运行这个 demo。
$ node demos/06.js
访问 http://127.0.0.1:3000/about ,效果与上一个例子完全相同。
2.3 静态资源
如果网站提供静态资源(图片、字体、样式表、脚本……),为它们一个个写路由就很麻烦,也没必要。koa-static模块封装了这部分的请求。请看下面的例子(完整代码看这里)。
// demos/12.js
const path = require('path');
const serve = require('koa-static');

const main = serve(path.join(__dirname));
app.use(main);
运行这个 Demo。
$ node demos/12.js
访问 http://127.0.0.1:3000/12.js,在浏览器里就可以看到这个脚本的内容。
2.4 重定向
有些场合,服务器需要重定向(redirect)访问请求。比如,用户登陆以后,将他重定向到登陆前的页面。ctx.response.redirect()方法可以发出一个302跳转,将用户导向另一个路由。请看下面的例子(完整代码看这里)。
// demos/13.js
const redirect = ctx => {
  ctx.response.redirect('/');
  ctx.response.body = '<a href="/">Index Page</a>';
};

app.use(route.get('/redirect', redirect));
运行这个 demo。
$ node demos/13.js
访问 http://127.0.0.1:3000/redirect ,浏览器会将用户导向根路由。
三、中间件
3.1 Logger 功能
Koa 的最大特色,也是最重要的一个设计,就是中间件(middleware)。为了理解中间件,我们先看一下 Logger (打印日志)功能的实现。
最简单的写法就是在main函数里面增加一行(完整代码看这里)。
// demos/07.js
const main = ctx => {
  console.log(`${Date.now()} ${ctx.request.method} ${ctx.request.url}`);
  ctx.response.body = 'Hello World';
};
运行这个 Demo。
$ node demos/07.js
访问 http://127.0.0.1:3000 ,命令行就会输出日志。
1502144902843 GET /
3.2 中间件的概念
上一个例子里面的 Logger 功能,可以拆分成一个独立函数(完整代码看这里)。
// demos/08.js
const logger = (ctx, next) => {
  console.log(`${Date.now()} ${ctx.request.method} ${ctx.request.url}`);
  next();
}
app.use(logger);
像上面代码中的logger函数就叫做“中间件”(middleware),因为它处在 HTTP Request 和 HTTP Response 中间,用来实现某种中间功能。app.use()用来加载中间件。
基本上,Koa 所有的功能都是通过中间件实现的,前面例子里面的main也是中间件。每个中间件默认接受两个参数,第一个参数是 Context 对象,第二个参数是next函数。只要调用next函数,就可以把执行权转交给下一个中间件。
运行这个 demo。
$ node demos/08.js
访问 http://127.0.0.1:3000 ,命令行窗口会显示与上一个例子相同的日志输出。
3.3 中间件栈
多个中间件会形成一个栈结构(middle stack),以“先进后出”(first-in-last-out)的顺序执行。
- 最外层的中间件首先执行。
- 调用
next函数,把执行权交给下一个中间件。- ...
- 最内层的中间件最后执行。
- 执行结束后,把执行权交回上一层的中间件。
- ...
- 最外层的中间件收回执行权之后,执行
next函数后面的代码。
请看下面的例子(完整代码看这里)。
// demos/09.js
const one = (ctx, next) => {
  console.log('>> one');
  next();
  console.log('<< one');
}

const two = (ctx, next) => {
  console.log('>> two');
  next();
  console.log('<< two');
}

const three = (ctx, next) => {
  console.log('>> three');
  next();
  console.log('<< three');
}

app.use(one);
app.use(two);
app.use(three);
运行这个 demo。
$ node demos/09.js
访问 http://127.0.0.1:3000 ,命令行窗口会有如下输出。
>> one
>> two
>> three
<< three
<< two
<< one
如果中间件内部没有调用next函数,那么执行权就不会传递下去。作为练习,你可以将two函数里面next()这一行注释掉再执行,看看会有什么结果。
3.4 异步中间件
迄今为止,所有例子的中间件都是同步的,不包含异步操作。如果有异步操作(比如读取数据库),中间件就必须写成 async 函数。请看下面的例子(完整代码看这里)。
// demo02/10.js
const fs = require('fs.promised');
const Koa = require('koa');
const app = new Koa();

const main = async function (ctx, next) {
  ctx.response.type = 'html';
  ctx.response.body = await fs.readFile('./demos/template.html', 'utf8');
};

app.use(main);
app.listen(3000);
上面代码中,fs.readFile是一个异步操作,必须写成await fs.readFile(),然后中间件必须写成 async 函数。
运行这个 demo。
$ node demos/10.js
访问 http://127.0.0.1:3000 ,就可以看到模板文件的内容。
3.5 中间件的合成
koa-compose模块可以将多个中件合成为一个。请看下面的例子(完整代码看这里)。
// demos/11.js
const compose = require('koa-compose');

const logger = (ctx, next) => {
  console.log(`${Date.now()} ${ctx.request.method} ${ctx.request.url}`);
  next();
}

const main = ctx => {
  ctx.response.body = 'Hello World';
};

const middlewares = compose([logger, main]);
app.use(middlewares);
运行这个 demo。
$ node demos/11.js
访问 http://127.0.0.1:3000 ,就可以在命令行窗口看到日志信息。
四、错误处理
4.1 500 错误
如果代码运行过程中发生错误,我们需要把错误信息返回给用户。HTTP 协定约定这时要返回500状态码。Koa 提供了ctx.throw()方法,用来抛出错误,ctx.throw(500)就是抛出500错误。请看下面的例子(完整代码看这里)。
// demos/14.js
const main = ctx => {
  ctx.throw(500);
};
运行这个 demo。
$ node demos/14.js
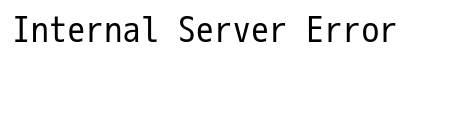
访问 http://127.0.0.1:3000,你会看到一个500错误页“Internal Server Error”。
4.2 404错误
如果将ctx.response.status设置成404,就相当于ctx.throw(404),返回404错误。请看下面的例子(完整代码看这里)。
// demos/15.js
const main = ctx => {
  ctx.response.status = 404;
  ctx.response.body = 'Page Not Found';
};
运行这个 demo。
$ node demos/15.js
访问 http://127.0.0.1:3000 ,你就看到一个404页面“Page Not Found”。

4.3 处理错误的中间件
为了方便处理错误,最好使用try...catch将其捕获。但是,为每个中间件都写try...catch太麻烦,我们可以让最外层的中间件,负责所有中间件的错误处理。请看下面的例子(完整代码看这里)。
// demos/16.js
const handler = async (ctx, next) => {
  try {
    await next();
  } catch (err) {
    ctx.response.status = err.statusCode || err.status || 500;
    ctx.response.body = {
      message: err.message
    };
  }
};

const main = ctx => {
  ctx.throw(500);
};

app.use(handler);
app.use(main);
运行这个 demo。
$ node demos/16.js
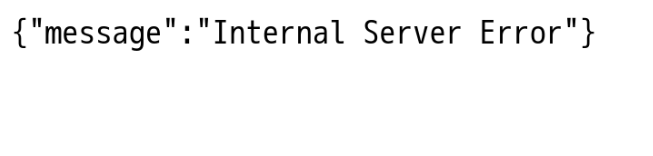
访问 http://127.0.0.1:3000 ,你会看到一个500页,里面有报错提示 {"message":"Internal Server Error"}。
4.4 error 事件的监听
运行过程中一旦出错,Koa 会触发一个error事件。监听这个事件,也可以处理错误。请看下面的例子(完整代码看这里)。
// demos/17.js
const main = ctx => {
  ctx.throw(500);
};

app.on('error', (err, ctx) =>
  console.error('server error', err);
);
运行这个 demo。
$ node demos/17.js
访问 http://127.0.0.1:3000 ,你会在命令行窗口看到“server error xxx”。
4.5 释放 error 事件
需要注意的是,如果错误被try...catch捕获,就不会触发error事件。这时,必须调用ctx.app.emit(),手动释放error事件,才能让监听函数生效。请看下面的例子(完整代码看这里)。
// demos/18.js`
const handler = async (ctx, next) => {
  try {
    await next();
  } catch (err) {
    ctx.response.status = err.statusCode || err.status || 500;
    ctx.response.type = 'html';
    ctx.response.body = '<p>Something wrong, please contact administrator.</p>';
    ctx.app.emit('error', err, ctx);
  }
};

const main = ctx => {
  ctx.throw(500);
};

app.on('error', function(err) {
  console.log('logging error ', err.message);
  console.log(err);
});
上面代码中,main函数抛出错误,被handler函数捕获。catch代码块里面使用ctx.app.emit()手动释放error事件,才能让监听函数监听到。
运行这个 demo。
$ node demos/18.js
访问 http://127.0.0.1:3000 ,你会在命令行窗口看到logging error 。
五、Web App 的功能
5.1 Cookies
ctx.cookies用来读写 Cookie。请看下面的例子(完整代码看这里)。
// demos/19.js
const main = function(ctx) {
  const n = Number(ctx.cookies.get('view') || 0) + 1;
  ctx.cookies.set('view', n);
  ctx.response.body = n + ' views';
}
运行这个 demo。
$ node demos/19.js
访问 http://127.0.0.1:3000 ,你会看到1 views。刷新一次页面,就变成了2 views。再刷新,每次都会计数增加1。

5.2 表单
Web 应用离不开处理表单。本质上,表单就是 POST 方法发送到服务器的键值对。koa-body模块可以用来从 POST 请求的数据体里面提取键值对。请看下面的例子(完整代码看这里)。
// demos/20.js
const koaBody = require('koa-body');

const main = async function(ctx) {
  const body = ctx.request.body;
  if (!body.name) ctx.throw(400, '.name required');
  ctx.body = { name: body.name };
};

app.use(koaBody());
运行这个 demo。
$ node demos/20.js
打开另一个命令行窗口,运行下面的命令。
$ curl -X POST --data "name=Jack" 127.0.0.1:3000
{"name":"Jack"}

$ curl -X POST --data "name" 127.0.0.1:3000
name required
上面代码使用 POST 方法向服务器发送一个键值对,会被正确解析。如果发送的数据不正确,就会收到错误提示。
2.3 文件上传
koa-body模块还可以用来处理文件上传。请看下面的例子(完整代码看这里)。
// demos/21.js
const os = require('os');
const path = require('path');
const koaBody = require('koa-body');

const main = async function(ctx) {
  const tmpdir = os.tmpdir();
  const filePaths = [];
  const files = ctx.request.body.files || {};

  for (let key in files) {
    const file = files[key];
    const filePath = path.join(tmpdir, file.name);
    const reader = fs.createReadStream(file.path);
    const writer = fs.createWriteStream(filePath);
    reader.pipe(writer);
    filePaths.push(filePath);
  }

  ctx.body = filePaths;
};

app.use(koaBody({ multipart: true }));
运行这个 demo。
$ node demos/21.js
打开另一个命令行窗口,运行下面的命令,上传一个文件。注意,/path/to/file要更换为真实的文件路径。
$ curl --form upload=@/path/to/file http://127.0.0.1:3000
["/tmp/file"]
Mooc系统项目实战课01期
![]() 2025/07/14 08:25 (Sydney)
2025/07/14 08:25 (Sydney)
AI Agent & MCP 项目实战营
![]() 2025/07/19 09:00 (Sydney)
2025/07/19 09:00 (Sydney)
AI for Data Analyst
![]() 2025/07/19 09:00 (Sydney)
2025/07/19 09:00 (Sydney)
Follow Us
We Accept
地址
Level 10b, 144 Edward Street, Brisbane CBD(Headquarter)Level 2, 171 La Trobe St, Melbourne VIC 3000四川省成都市武侯区桂溪街道天府大道中段500号D5东方希望天祥广场B座45A13号Business Hub, 155 Waymouth St, Adelaide SA 5000Disclaimer
JR Academy acknowledges Traditional Owners of Country throughout Australia and recognises the continuing connection to lands, waters and communities. We pay our respect to Aboriginal and Torres Strait Islander cultures; and to Elders past and present. Aboriginal and Torres Strait Islander peoples should be aware that this website may contain images or names of people who have since passed away.
匠人学院网站上的所有内容,包括课程材料、徽标和匠人学院网站上提供的信息,均受澳大利亚政府知识产权法的保护。严禁未经授权使用、销售、分发、复制或修改。违规行为可能会导致法律诉讼。通过访问我们的网站,您同意尊重我们的知识产权。 JR Academy Pty Ltd 保留所有权利,包括专利、商标和版权。任何侵权行为都将受到法律追究。查看用户协议
© 2017-2025 JR Academy Pty Ltd. All rights reserved.
ABN 26621887572